Do-It-Yourself
Tech Support
Welcome to the technical support page for Cybernet. If you’ve come here, likely you’re experiencing a technical issue with your internet connectivity. Yes, it’s a broad statement, but that’s technical troubleshooting for you – there are a variety of issues that you may come across, and if you get lost along the way in your attempt to fix it, the solution can become even harder to solve.
And that’s where this document hopes to help you. Here, I’m going to put down all that I can in order to help you get back up and running. Click on the links below if any of them relate to your issue. Please read the General Tips section and be sure to read through each section related to your issue thoroughly. If you don’t have an internet connection, read through the entire “My internet doesn’t work!” section. You may skip the router section if it does not apply to you.
As always, if you have any suggestions for this technical support page, please e-mail webmaster@cybernetcom.ca. This could be additions, layout issues, organization issues, whatever. The end goal is to make troubleshooting your network as simple and efficient as possible, so feel free to help us make that happen.
Table of Contents
1. General Tips
2. ISSUE: My internet doesn’t work!
2.1.0. Dial-Up Users
2.1.1. The PoE (little white/grey box)
2.1.2. Do you have a router?
2.2. Power-Cycling Your Equipment
2.2.1. Power-Cycle the radio
2.2.2. Power-Cycle the router
2.3. Are Your Network Connections Set Properly?
2.3.1. If you do not have a router
2.3.2. If you do have a router
3. ISSUE: Anything email related (setting up an account, making an account work as it should, etc).
3.1. Outlook Express : Account Setup
3.2. Outlook Express : Not Sending and/or Receiving Mail
3.3. Microsoft Outlook : Account Setup
3.4. Microsoft Outlook : Not Sending and/or Receiving Mail
1.0 General Tips
When troubleshooting your network, only unplug and test one thing at a time. If you do multiple steps at once, you won’t know which step is causing the issue.
When your radio is set up, you will receive an install sheet with some numbers and other information on it. Please keep this sheet and have it handy when troubleshooting your network. You will need it. At a few points in this guide it will be mentioned that you need this sheet. If you are at these points in the guide, but don’t have the sheet, you will need to call us.
If you’ve followed this guide and still have an issue, do not hesitate to call Cybernet at 1-250-847-5020. We are happy to help, however it is advised that you try these steps yourself before calling us – most of the technician calls have been related to these simple steps.
When you call in, be sure to have the following information handy:
Ø Your username
Ø Are you high-speed or dial-up?
Ø Do you have a router?
Ø What type of router do you have? (The name is on the router – D-Link, Link-Sys, Belkin)
Ø What exactly is your issue? (Be as detailed as possible)
Ø What have you done to try and resolve the issue?
Ø What operating system are you running? (i.e. Mac, Windows 98, Windows XP, Windows Vista, etc)
2.0 ISSUE: My internet doesn’t work!
So… you’ve opened up a web browser (Internet Explorer, Firefox, Opera, etc) and you get ann error message “This page cannot be displayed” or “Server not found” or something similar.
2.1 Check the Connections
The first step is always, always check the connections.
2.1.0 Dial-Up Users
For those of you on dial-up, all you need to do is confirm that the phone cord is plugged into the wall properly, and that the other end is plugged into the modem on your computer. If you get as far as the password prompt, make sure to enter the correct password. If you still can’t get online, please call us and we will assist you.
2.1.1 The PoE (little white/grey box)
First, look at the PoE (Power over Ethernet) box. This is usually a little white box with a green LED light (but it may be a grey box if it is an older model).
Ø Check to see that the green light is on.
- If the green light is off
- Make sure the power supply is plugged in snuggly to the wall
- Put your hand on the power supply to see if it is warm.
- If it’s not, you may have a dead power supply, in which case, it will need replacing.
- The LED may be burnt out, but if the power supply is still warm, the PoE is functional
Ø Check to make sure the port labeled ‘CPE’ is connected to the cable that is going outside to your radio.
- If it turns out to be connected to the cable that is going to your computer/router, then unplug both cables.
- The cable going to your computer should be in the port labeled PC.
- The cable going to your radio outside should be in the port labeled CPE.
Ø Make sure both cables are snug in the sockets – if they’re loose, they may get disconnected by accident.
If you don’t have a router:
If you do not have a router, then confirm that the cable running from the PC port on the little white box is properly inserted into the Ethernet port on the back of your PC.
If you do have a router, ignore this and proceed to the next section. For those of you who do not know what a router is, it is a rectangular box with an antenna or two on it – a few common names on the router are Link-Sys, D-Link, Zonet, or Belkin.
2.1.2 Do you have a
router?
Here is the tricky part. If you have a router, follow these steps exactly, please. There are a variety of routers out there, but the steps should be the same.
Ø Check to see that there is power to the router – lights should be on and possibly flickering.
- If there are no lights on the router
- Confirm that the power supply is properly plugged into the wall and into the router
- Put your hand on the power supply to see if it is warm.
- If it’s not, you may have a dead power supply, in which case, it will need replacing.
Ø Check the connections to the router
o The cable from the PC port on the little white box should be plugged into the port labeled ‘Internet’ or ‘WAN’ or ‘WLAN’ on the router.
o There should be another cable plugged into one of the numbered ports on the router – this one plugs into Ethernet port on the back of your computer.
2.1.3 Restart
Now that everything is in place, reboot your computer. Open a web browser (Internet Explorer, Firefox, Opera, etc) and try to connect to the internet (your homepage should come up instead of an error). If you still can’t, please proceed.
2.2 Power-Cycling Your Equipment
Now that we’ve confirmed that all your equipment is properly connected let’s do one of the most routine checks: power-cycling your equipment.
2.2.1 Power-Cycle the
Radio
To power-cycle the radio, unplug the cable in the CPE port on the PoE (little white/grey/black box) for a minimum of 10 seconds.
2.2.1.3 Restart
Now that everything is in place, reboot your computer. Open a web browser (Internet Explorer, Firefox, Opera, etc) and try to connect to the internet (your homepage should come up instead of an error). If you still can’t, please proceed.
2.2.2 Power-Cycle the
Router
If you have a router, power-cycle the router. This can be done by unplugging the power cord from the router for a minimum of 10 seconds, or via an on/off switch if your router has one. DO NOT push the ‘reset’ button on your router – this sets it back to default settings, and you will need to reconfigure it.
2.2.2.3 Restart
Now that everything is in place, reboot your computer. Open a web browser (Internet Explorer, Firefox, Opera, etc) and try to connect to the internet (your homepage should come up instead of an error). If you still can’t, please proceed.
2.3 Are Your Network Connections Set Properly?
2.3.1 If you do not
have a router
At this point, we want to make sure your internet connection is set up properly. You will now be entering information provided on the install sheet that came with your radio. If you don’t have it, and cannot find it, please call us for this information. If you have the sheet, please proceed.
The following instructions assume you are using Windows XP. If you are using a different version of Windows, try your best to follow these instructions and see if you can get to anywhere similar to what is being described here. If you are using a Mac or a different platform than Windows, you may need to contact Cybernet directly, and we can assist you in setting up your connection.
2.3.1.1 Quick Setup
Start à Control Panel à Network Connections à [Right-click] Local Area Connection à Properties à Internet Protocol (TCP/IP) Properties
2.3.1.2 Slightly Longer Setup
Click Start à Control Panel


If window that comes up has a white background with a lot of icons, look for the Network Connections icon and double-click that.
Otherwise, if the window has a blue background, in the top-left of the window there is a button “Switch to Classic View”. Click that. Now look for the Network Connections icon and double-click that.
![]()

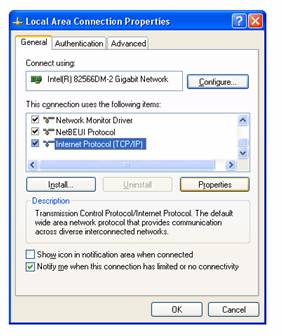
Right-click on Local Area Connection and choose properties from the menu that appears.

Under the field “This connection uses the following items” click “Internet Protocol (TCP/IP)” once and click the Properties button.
![]()
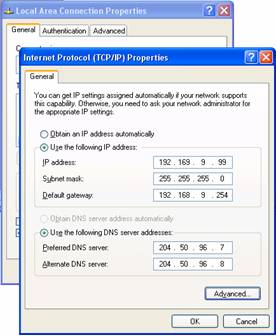
Now you will need to enter the numbers provided by Cybernet – these are on the install sheet.
Ø Click the radio button for “Use the following IP address”
o IP Address should be the number listed as “User IP” on the sheet. Make sure to get the dots in the right place
o Subnet Mask is 255.255.255.0
o Default gateway is the number listed as “User Gateway” on the sheet
Ø Click the radio button for “Use the following DNS server addresses”
o Preferred DNS server is 204.50.96.7
o Alternate DNS server is 204.50.96.8
Click OK on this window, and OK (or the Close button) on the other window.
2.3.1.3 Restart
Now that everything is in place, reboot your computer.
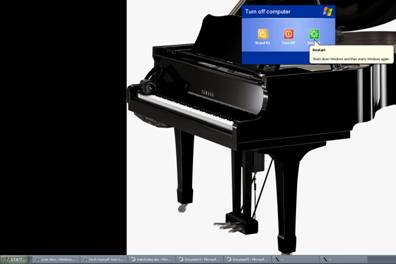
Once your computer is rebooted, open a web browser (Internet Explorer, Firefox, Opera, etc) and try to connect to the internet (your homepage should come up instead of an error). If you still can’t, please proceed.
2.3.2 If you do have
a router
At this point, we want to make sure your internet connection is set up properly.
The following instructions assume you are using Windows XP. If you are using a different version of Windows, try your best to follow these instructions and see if you can get to anywhere similar to what is being described here. If you are using a Mac or a different platform than Windows, you may need to contact Cybernet directly, and we can assist you in setting up your connection.
2.3.2.1 Quick Setup
Start à Control Panel à Network Connections à [Right-click] Local Area Connection à Properties à Internet Protocol (TCP/IP) Properties
2.3.2.2 Slightly Longer Setup
Click Start à Control Panel

If window that comes up has a white background with a lot of icons, look for the Network Connections icon and double-click that.
Otherwise, if the window has a blue background, in the top-left of the window there is a button “Switch to Classic View”. Click that. Now look for the Network Connections icon and double-click that.
![]()

Right-click on Local Area Connection and choose properties from the menu that appears.
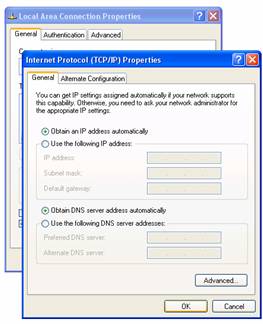
Under the field “This connection uses the following items” click “Internet Protocol (TCP/IP)” once and click the Properties button.
Ø Confirm that the radio button beside “Obtain IP address automatically” is selected
Ø Confirm that the radio button beside “Obtain DNS server address automatically” is selected
Ø If they aren’t like this, change it now.
2.3.1.3 Restart
Now that everything is in place, reboot your computer.
Once your computer is rebooted, open a web browser (Internet Explorer, Firefox, Opera, etc) and try to connect to the internet (your homepage should come up instead of an error). If you still can’t, please proceed.
2.3.2.3 Checking your
router settings
Ø Open up your preferred web browser (Internet Explorer, Firefox, Opera, etc)
Ø In the address bar at the top, where the address of your home-page is, type in the corresponding address depending on the brand name of your router.
2.3.2.3.1 Link-Sys Router
If you have a Link-Sys router, type http://192.168.1.1/ and press Enter or the Go button
A prompt should come up with a request for a username and password
o Username : admin
o Password : admin
o If that combination of username/password doesn’t work, leave the username blank and try ‘admin’ for the password
o If that doesn’t work, then you may need to reset your router. Feel free to call us if you have this issue.
Now you should see a black and purple page with the word “Link-Sys” on it, or something similar.
Ø Click on Setup.
Ø In the drop down menu (will most likely say Automatic Configuration) select Static IP
Ø Internet IP Address should be the number listed as “User IP” on the sheet.
Ø Subnet Mask is 255.255.255.0
Ø Gateway is the number listed as “User Gateway” on the sheet
Ø Static DNS 1 is 204.50.96.7
Ø Static DNS 2 is 204.50.96.8
Ø Static DNS 3 is 0.0.0.0
If all those settings are correct, you may close your web browser and proceed with the next section of the guide, call us at Cybernet Communications and we will be happy to assist you. If any of those numbers were incorrect, change them accordingly and do the following:
Ø Click the Save Setting button at the bottom of the page.
Ø A message indicating that “Setting are successful” will appear. Click Continue.
Ø Close the web browser and reboot your computer.
Ø Try to access the internet using your web browser
2.3.2.3.1 D-Link Router
If you have a D-Link router, type http://192.168.0.1/ and press Enter or the Go button
A page will appear with with a request for a username and password
o Username : admin
o Password : [leave blank]
Now you should see a grey page with the word “D-Link” on it, or something similar.
Ø Click on Wireless.
Ø Enter the information as required in the Wizard
Ø Internet IP Address should be the number listed as “User IP” on the sheet.
Ø Subnet Mask is 255.255.255.0
Ø Gateway is the number listed as “User Gateway” on the sheet
Ø Static DNS 1 is 204.50.96.7
Ø Static DNS 2 is 204.50.96.8
Ø Static DNS 3 is 0.0.0.0
If all those settings are correct, you may close your web browser and proceed with the next section of the guide, call us at Cybernet Communications and we will be happy to assist you. If any of those numbers were incorrect, change them accordingly, apply the changes, and close the browser. Reboot your computer and try to access the internet using your web browser.
2.3.2.3.2 Belkin Router
If you have a Belkin router, type http://192.168.2.1/ and press Enter or the Go button
Click on LAN Settings in the left pane.
Ø Internet IP Address should be the number listed as “User IP” on the sheet.
Ø Subnet Mask is 255.255.255.0
Ø Gateway is the number listed as “User Gateway” on the sheet
Click Apply Changes
Click on DNS in the left pane.
Ø DNS Address is 204.50.96.7
Ø Secondary DNS is 204.50.96.8
Click Apply Changes
2.3.2.3.3 Other Router Brand
If you have a different brand of router, please contact us and we will assist you in the process.
2.3.2.4 Restart
Now that everything is in place, reboot your computer. Open a web browser (Internet Explorer, Firefox, Opera, etc) and try to connect to the internet (your homepage should come up instead of an error). If you still can’t, please proceed.
2.4 Call Cybernet
At this point, if you are unable to connect to the internet, please call us and we will assist you in any way we can.
3.0 ISSUE: Anything email related (setting up an account, making an account
work as it should, etc).
So you want to get e-mail, but it’s not working for any some such reason. The first thing to confirm is that your internet connection actually works. So open your web browser (Internet Explorer, Firefox, Opera, etc) and try to get to a page, such as www.cybernetcom.ca. If it comes up, perfect – your internet is working. If not, go to Section 2.0 and try to resolve your internet connection (call us if you can’t get it working after trying the suggested procedures).
At this point, I assume you have a working internet connection. Proceed to the next sections for information on how to set up accounts on a variety of mail clients. I assume that you are using Windows XP.
3.1 Outlook Express : Account Setup
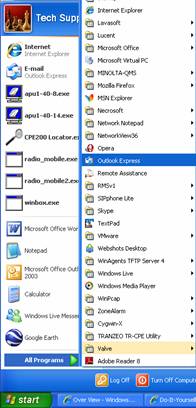
Click Start à All Programs à Outlook Express

Click Tools à Accounts à Mail à Add à Mail
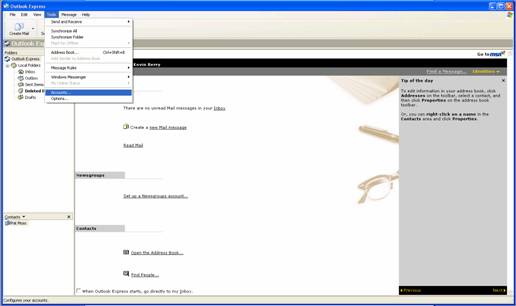
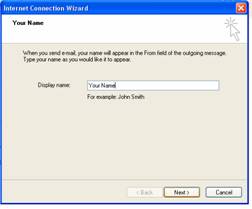
Ø Enter a display name (this will be the name that people see when they get e-mail from you)
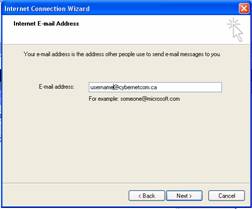
Ø Enter your e-mail address: username@bulkley.net
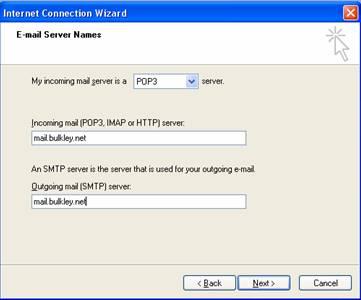
Ø Type of Mail Server is POP3 and your INCOMING and OUTGOING MAIL SERVERS are both ‘mail.bulkley.net’
Ø The password you will need to use is the one you chose at Cybernet Communications
Ø If you are asked how you connect, please make sure to choose MANUALLY.
Ø Finish the wizard.
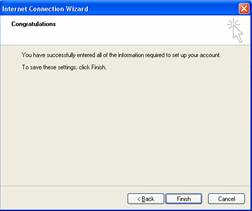
You are now ready to send and receive mail.
You must click the Send/Receive button to do so.
3.2 Outlook Express : Not Sending and/or Receiving Mail
If you’ve come here, then you’re having difficulties sending and/or receiving mail using Outlook Express. You may be able to send, but you can receive, or vice versa – or you can’t do either.
First things first – hit the Send/Receive button. If nothing happens, then you may not have any mail. But if you get an error, likely your settings are not what they should be. So let’s double-check your mail settings.
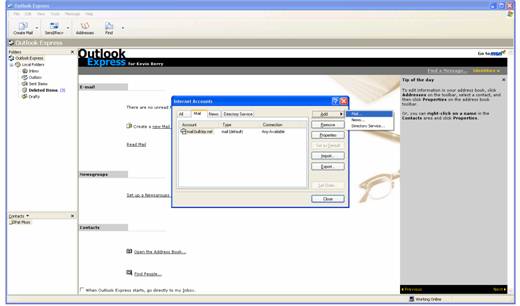
Click Start à All Programs à Outlook Express
Click Tools à Accounts à Mail à [Highlight mail.bulkley.net] à Properties
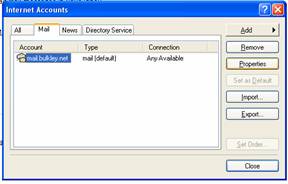
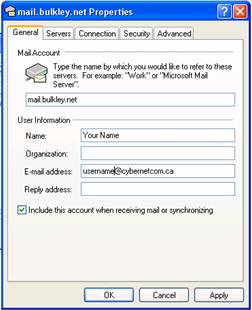
Ø In the General tab, confirm that your e-mail address is username@bulkley.net (where username is the name of your Cybernet account)
Ø Confirm that the check-box for “Include this account when receiving mail or synchronizing” is checked
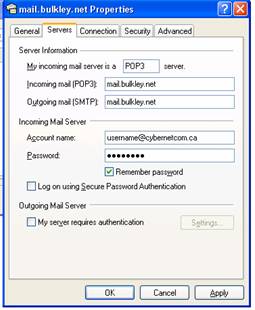
Ø In the Servers tab, confirm that the incoming mail server is a POP3 server.
Ø Incoming mail (POP3) should be ‘mail.bulkley.net’
Ø Outgoing mail (SMTP) should be ‘mail.bulkley.net’
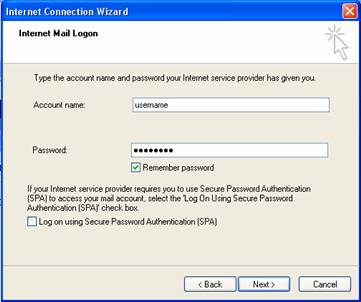
Ø Account name should be username@bulkley.net (where username is the name of your Cybernet account)
Ø Password should be the password you gave to Cybernet
Ø If you don’t want to type your password every time you log in or try to send mail, make sure to leave the “Log in using Secure Password Authentication” and “My server requires authentication” unchecked.
If any of these settings are incorrect, please correct them, click OK, then Close the other window, and click the Send/Receive button again. If you are not sure if you have mail, send yourself an e-mail by clicking “Create Mail”. If you are still unable to send or receive mail, call us at Cybernet and we will assist you in any way we can.
3.3 Microsoft Outlook : Account Setup
Click Start à All Programs à Microsoft Office à Microsoft Office Outlook
Click Tools à E-mail Accounts
Ø Click the radio button beside “Add a new e-mail account”
Ø Click Next
Ø Server Type is POP3
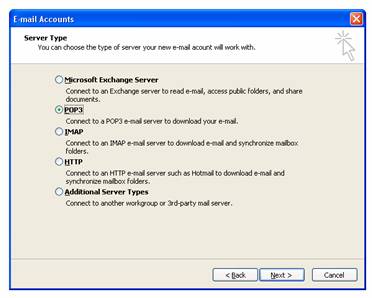
Ø Click Next
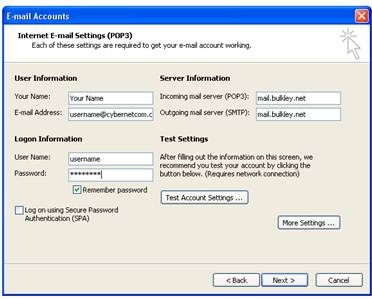
Ø Incoming mail server (POP3) is ‘mail.bulkley.net’
Ø Outgoing mail server (SMTP) is ‘mail.bulkley.net’
Ø E-mail address is your Cybernet e-mail address, username@bulkley.net
Ø Under Logon Information, Username is your Cybernet username, and password is your Cybernet password
Ø Check “Remember password” to avoid typing the password in every time you log in.
Ø If you do not want the computer to ask for your password every time you log in, do not check the “Log on using Secure Password Authentication (SPA)”
Ø Click Finish
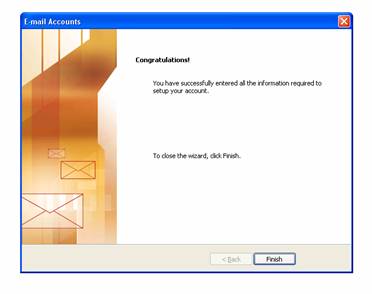
You are now ready to send and receive mail. You must click the Send/Receive button to do so.
3.4 Microsoft Outlook : Not
Sending and/or Receiving Mail
If you’ve come here, then you’re having difficulties sending and/or receiving mail using Microsoft Office Outlook. You may be able to send, but you can receive, or vice versa – or you can’t do either.
First things first – hit the Send/Receive button. If nothing happens, then you may not have any mail. But if you get an error, likely your settings are not what they should be. So let’s double-check your mail settings.
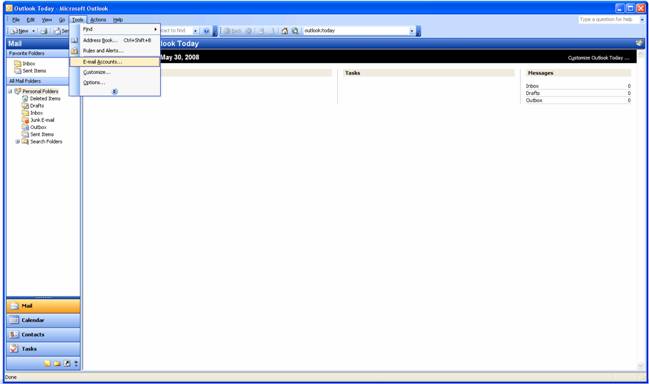
Click Start à All Programs à Microsoft Office à Microsoft Office Outlook
Click Tools à E-mail Accounts
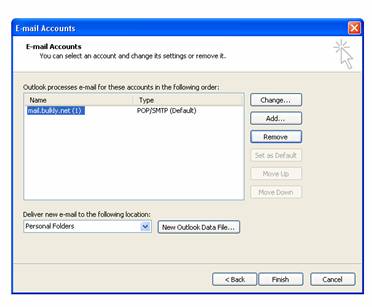
Ø Click the radio button beside “View or change existing accounts”
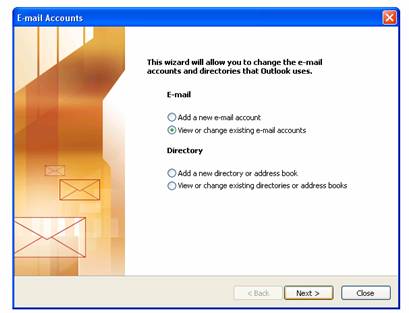
Ø Click Next
Ø Click on the account you want to edit and click the “Change…” button
![]()
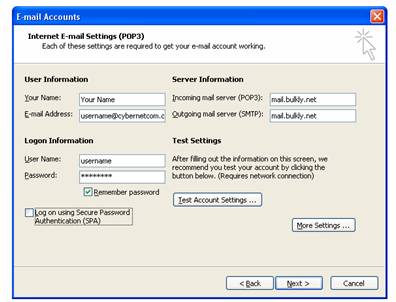
Ø Incoming mail server (POP3) is ‘mail.bulkley.net’
Ø Outgoing mail server (SMTP) is ‘mail.bulkley.net’
Ø E-mail Address is your Cybernet e-mail address, username@bulkley.net
Ø Under Logon Information, Username is your Cybernet username, and password is your Cybernet password
Ø Check “Remember password” to avoid typing the password in every time you log in.
Ø If you do not want the computer to ask for your password every time you log in, do not check the “Log on using Secure Password Authentication (SPA)”
Ø Click Next
Ø Click Finish
If any of these settings are incorrect, please correct them and click the Send/Receive button again. If you are not sure if you have mail, send yourself an e-mail by clicking “New”. If you are still unable to send or receive mail, call us at Cybernet and we will assist you in any way we can.